• Skip to content
  • Skip to primary sidebar

Gina Luker HomepageGina Luker

Hey there, I’m Gina! I help bloggers take their businesses from half-ass to BADA$$

  • About
  • Home
  • Blog
  • Courses
    • Email Marketing For Blogger’s
    • Irresistible Instagram Course
    • Pin Power
    • Sales Funnel Formula
    • SEO Superstar
  • Resources
  • Privacy Policy

Gina Luker

January 15, 2019 by Gina Luker

How to Install Lightroom Mobile Presets (+ 6 Free Presets!)

Have you tried Lightroom Mobile Presets? I’ve gotta tell you – they are a game changer! They take away the agony of trying to get your photos from blah to BAM – in literally one tap. Setting them up takes about 60 seconds, but the time it will save you in the long run is so worth it. And I’m going to walk you through it step by step. 

Take your photos from blah to BAM with one tap using Lightroom Mobile Presets. Learn to download and install Lightroom mobile presets - and get this awesome set of 6 presets for FREE! #lightroommobile #phonephotography #photoediting #photography #instagram  

What are Adobe Lightroom CC Mobile Presets?

Presets are like shortcuts to turning your photos into expertly edited photos with one tap. It’s a set of “instructions” you use in the free Adobe Lightroom CC Mobile app to edit your photos. To use them, just choose your photo – hit the preset you want and you’re done. It’s so easy!

PLEASE NOTE: There are a LOT of photos in this post. Do not be intimidated – I’m showing every tiny step so you know exactly what to do and won’t get lost, k? Let’s get to it!


You’ll need these apps for this to work on an iPhone (

How to Download Lightroom Mobile Presets

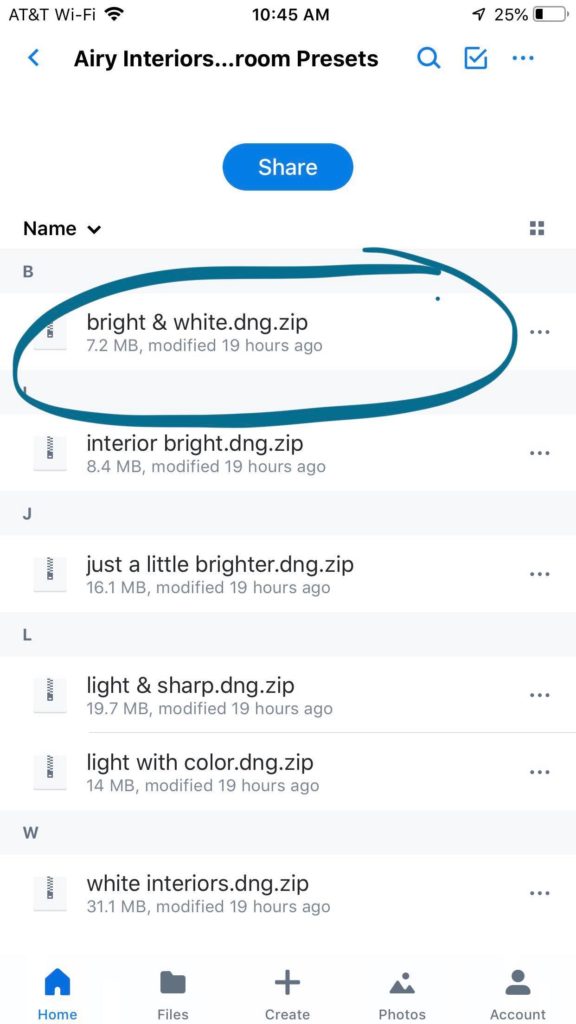
Next, you need to download your presets (you can find my free ones at the bottom of this post). These are in Dropbox, so you may have to have that app, too. If you’re on an iPhone, you’ll need the “Unzip” app because almost all Lightroom Mobile Presets – including mine – come in a zip file. Click on the file name.

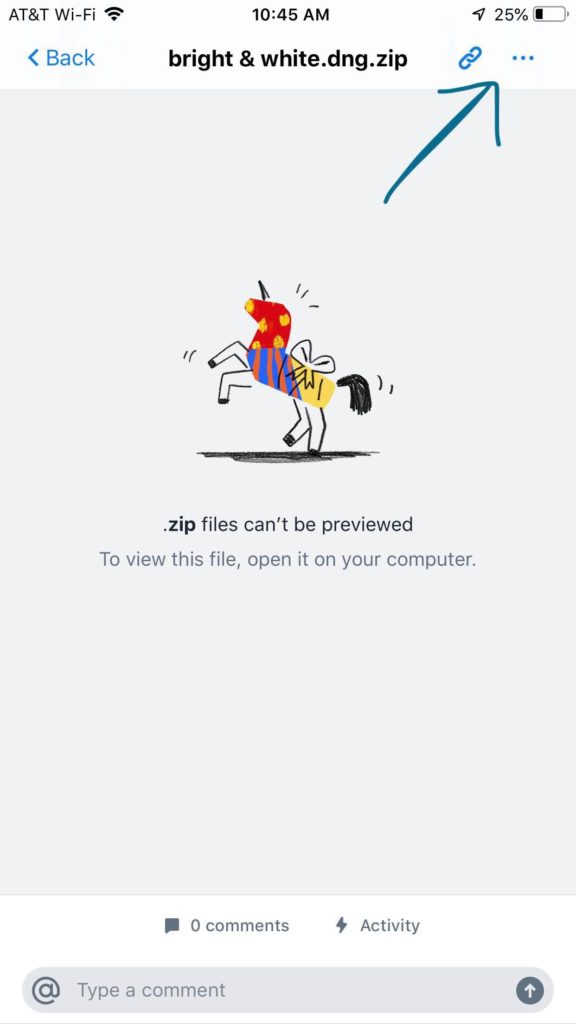
Next, click on the three dots “…” in the upper righthand corner to open a menu.

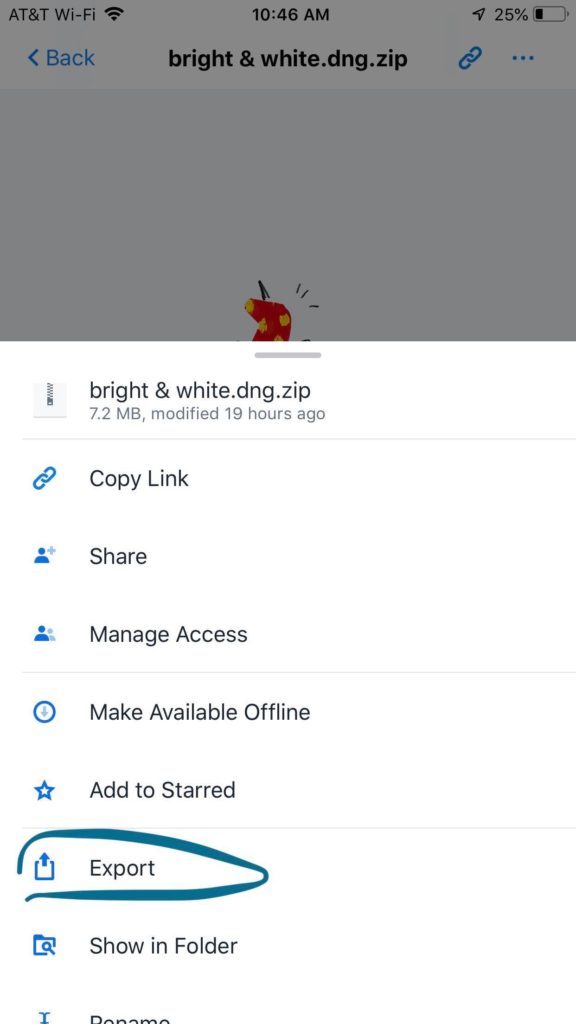
Once the menu is open – then select “EXPORT” 

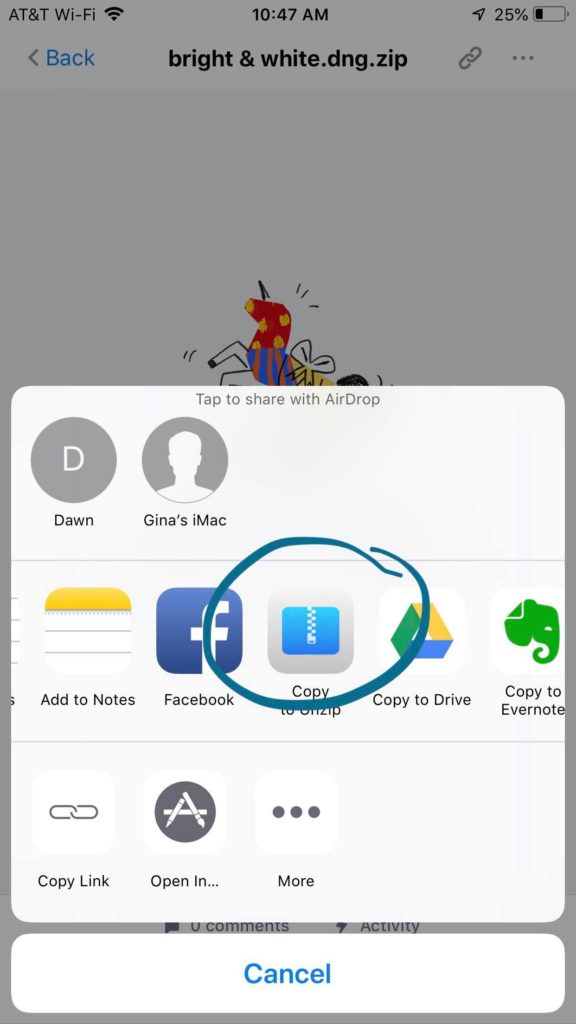
Then select the UNZIP app  – you may have to scroll across a bit to find it, depending on how many apps are on your phone.

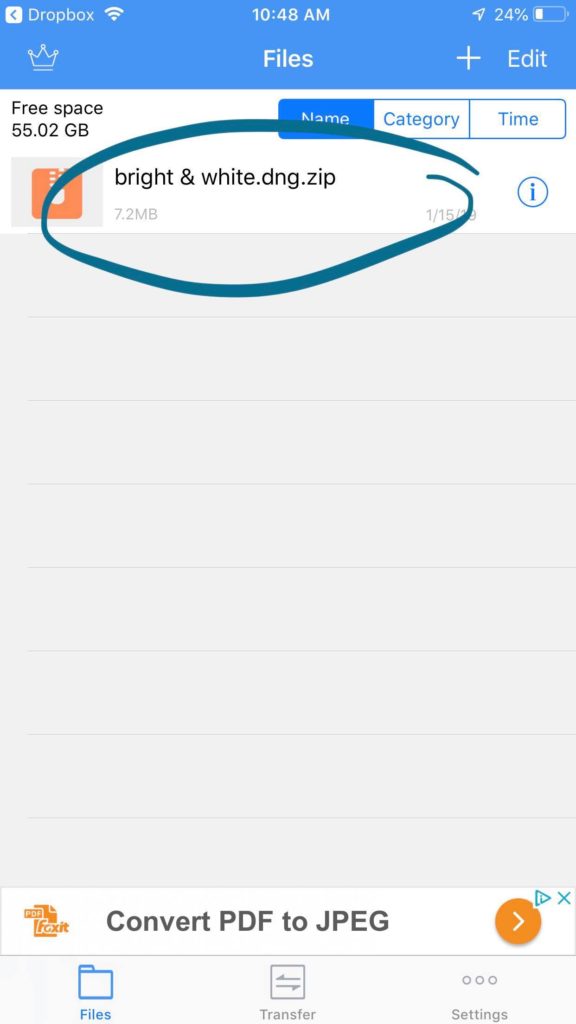
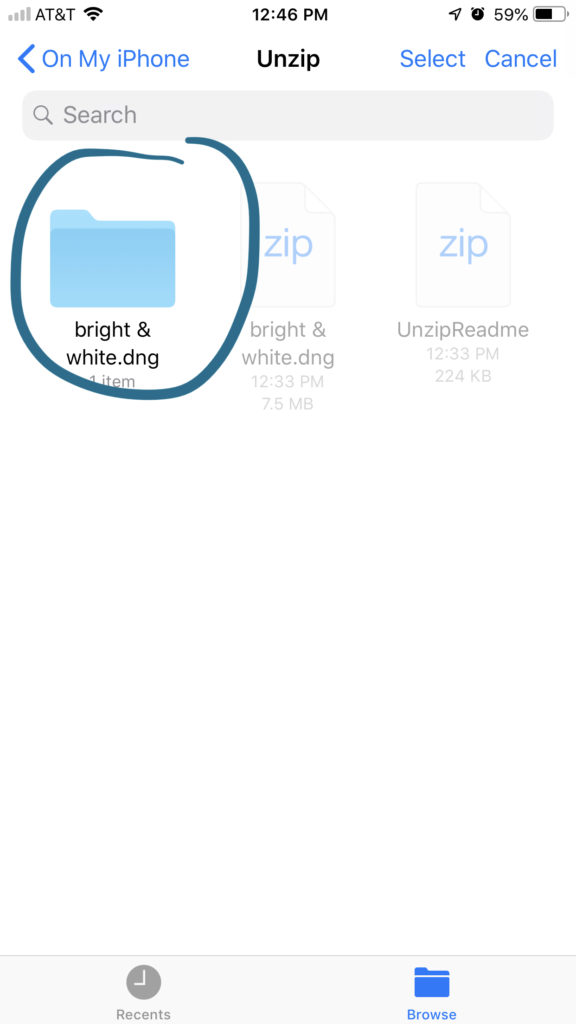
When it’s saved, then open up the Unzip app – and tap on the file name to unzip the file.

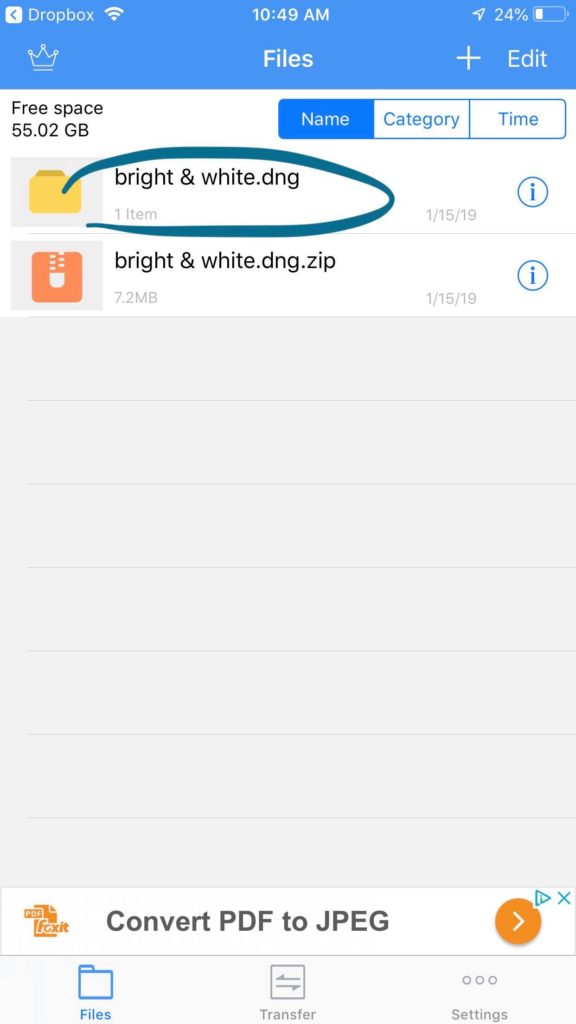
After it’s unzipped, you can click on the folder name to see the file.

Now your preset is ready to install into Adobe Lightroom CC Mobile.

How to Import Lightroom Mobile Presets

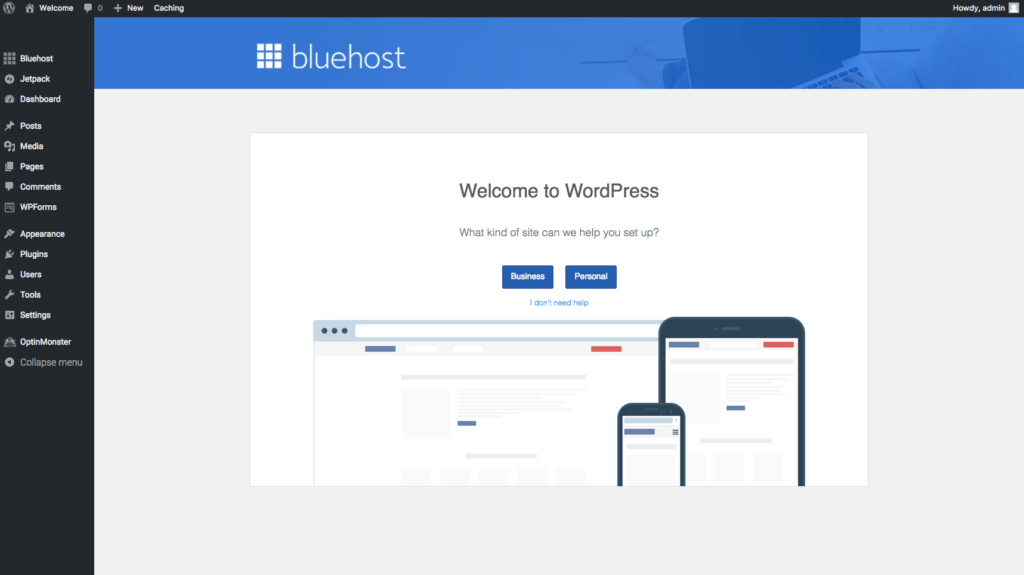
First, you’ll need to install Lightroom Mobile on your phone by downloading it from the App Store. Once you have it on your phone, you’ll need to “sign up” using either your Facebook or email address. Unlike desktop Lightroom, it’s completely free. Though if you do have Creative Cloud, it will sync them for you so once you have the presets on your mobile device it will then add them on your desktop version – sweet, huh? 

Take your photos from blah to BAM with one tap using Lightroom Mobile Presets. Learn to download and install Lightroom mobile presets - and get this awesome set of 6 presets for FREE! #lightroommobile #phonephotography #photoediting #photography #instagram

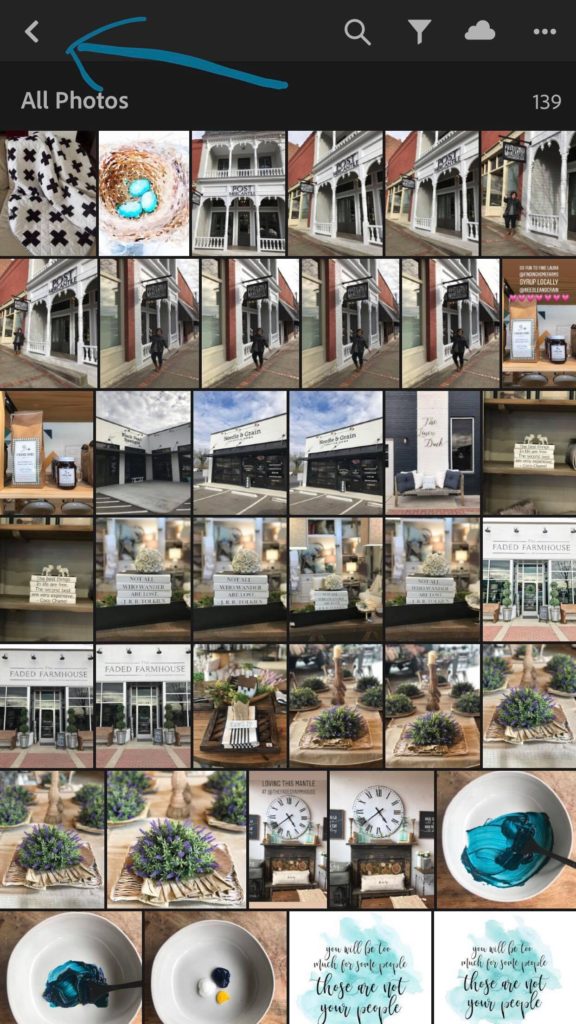
Once you have the app downloaded and opened, you’ll need to make sure you are in your library. The default setting is “Photos” – so choose the arrow in the upper left hand corner to get to your library.

Take your photos from blah to BAM with one tap using Lightroom Mobile Presets. Learn to download and install Lightroom mobile presets - and get this awesome set of 6 presets for FREE! #lightroommobile #phonephotography #photoediting #photography #instagram

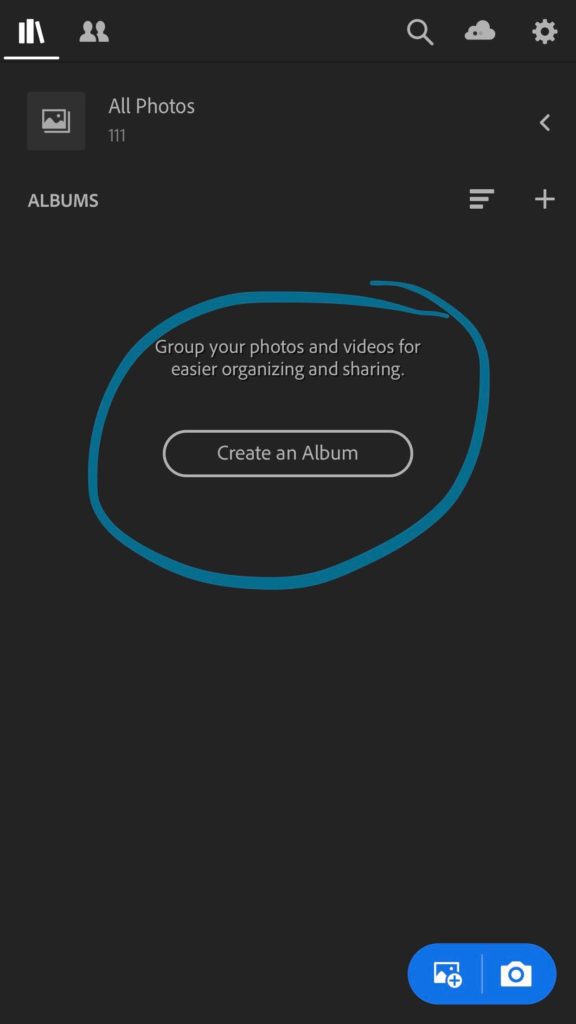
Now let’s create an album. Click on the “Create an Album” button.

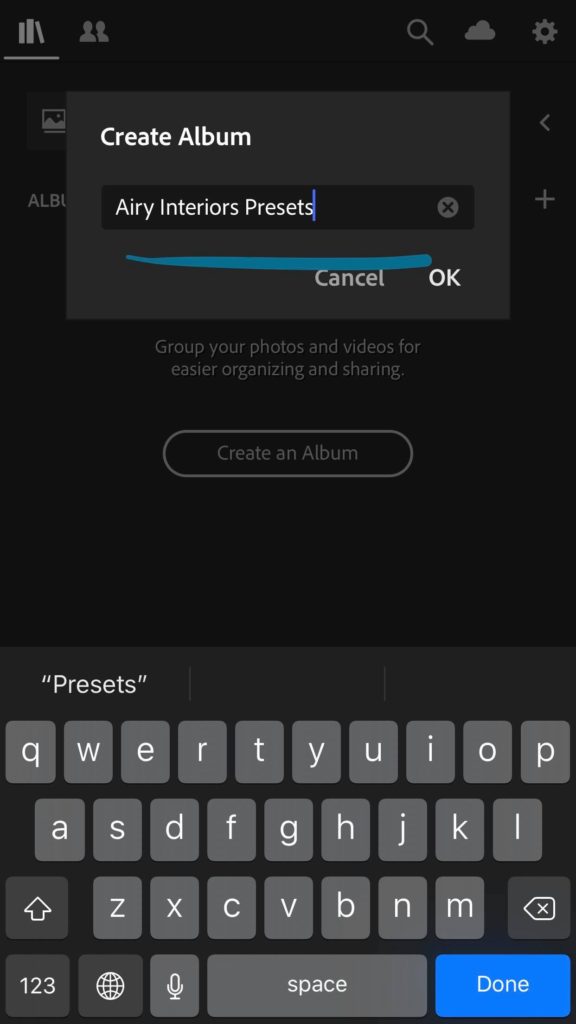
Then name your Album and click “OK”.

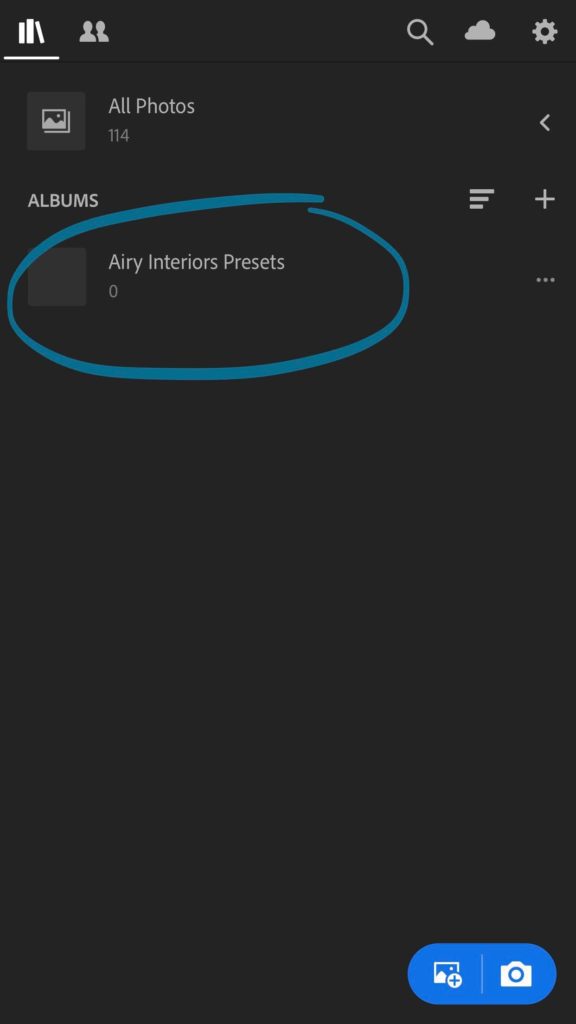
Your album is there, but you’ll need to import your files – so click on it in the library.

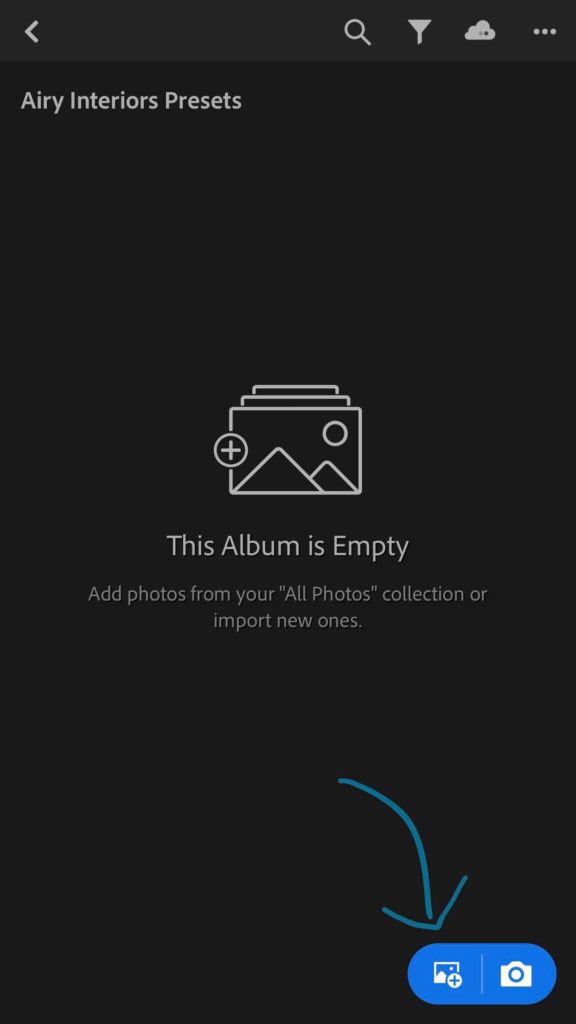
It will say “This Album is Empty” – so let’s import the files now. Tap on the add icon on the left side of the button in the bottom right hand corner.

Take your photos from blah to BAM with one tap using Lightroom Mobile Presets. Learn to download and install Lightroom mobile presets - and get this awesome set of 6 presets for FREE! #lightroommobile #phonephotography #photoediting #photography #instagram

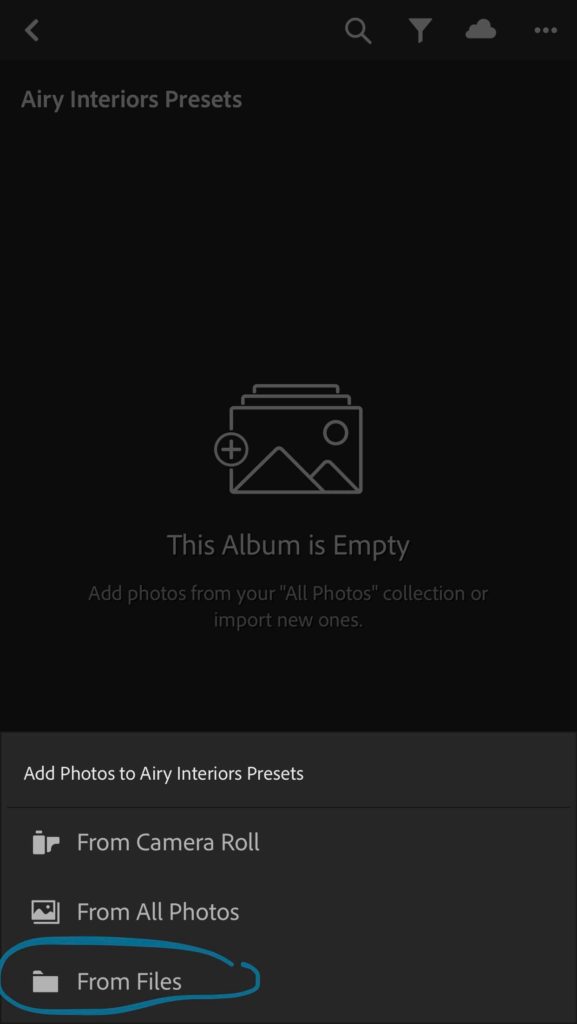
Then choose “From Files” from the drop down menu.

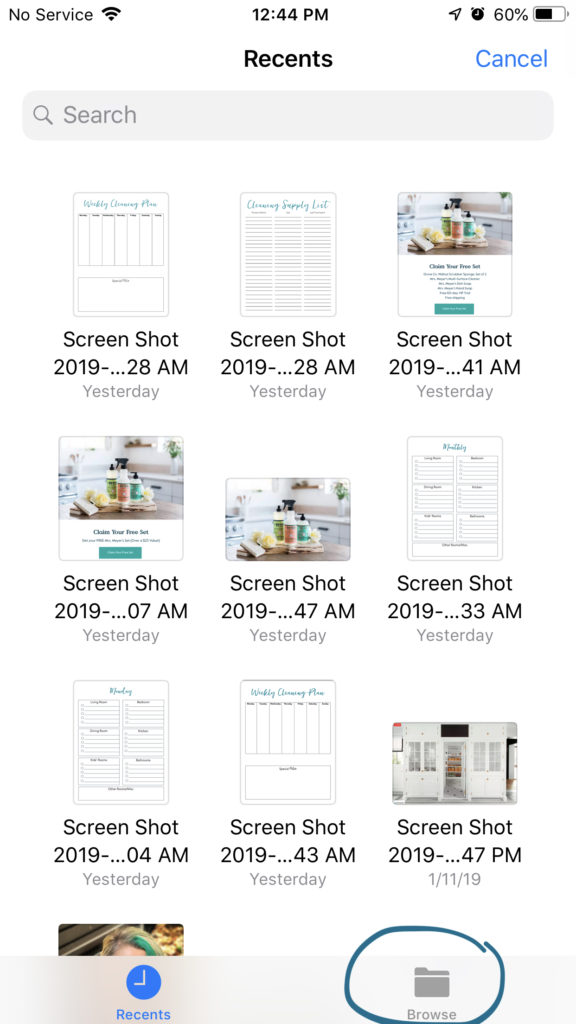
At the bottom, you’ll see “Recent” and “Browse” – choose BROWSE

Then you’ll see different locations – choose ON MY IPHONE

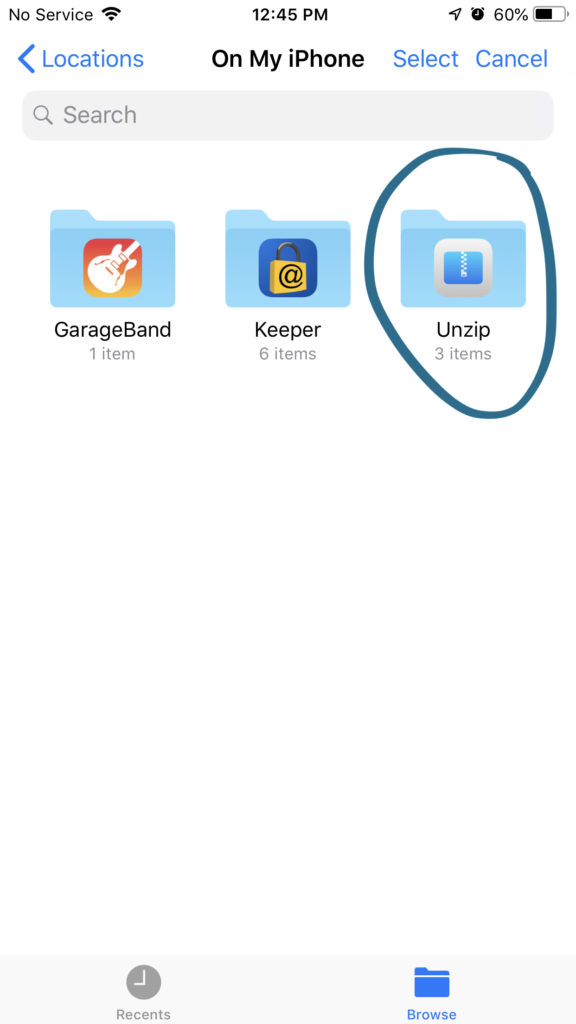
Then choose the Unzip App from your phone.

Then you will find the folder with the Lightroom Mobile Preset you’d like to import – so select it.


Take your photos from blah to BAM with one tap using Lightroom Mobile Presets. Learn to download and install Lightroom mobile presets - and get this awesome set of 6 presets for FREE! #lightroommobile #phonephotography #photoediting #photography #instagram

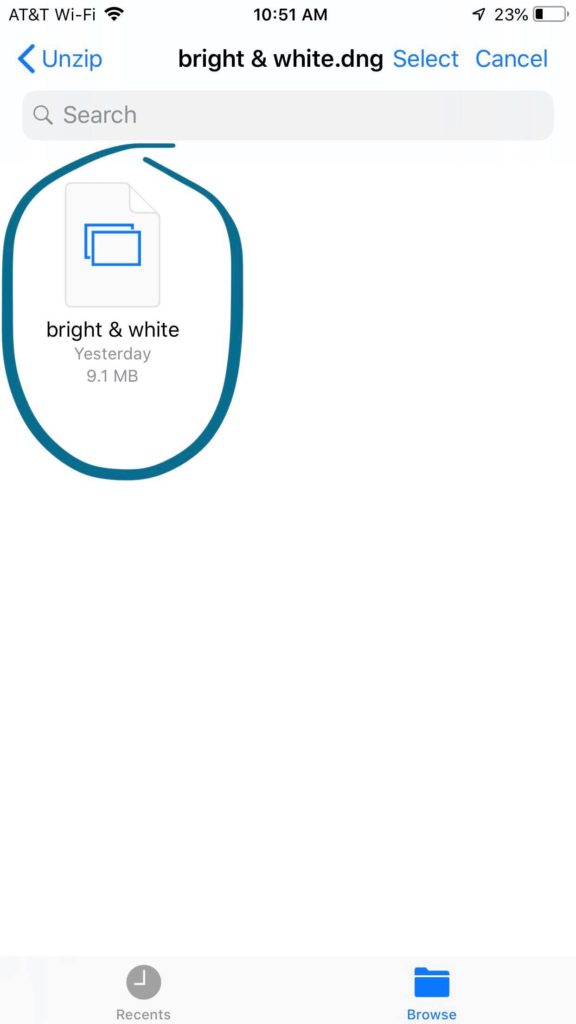
Inside that folder you’ll see the file – tap on it and it will import it into Lightroom Mobile. So now switch to that app.

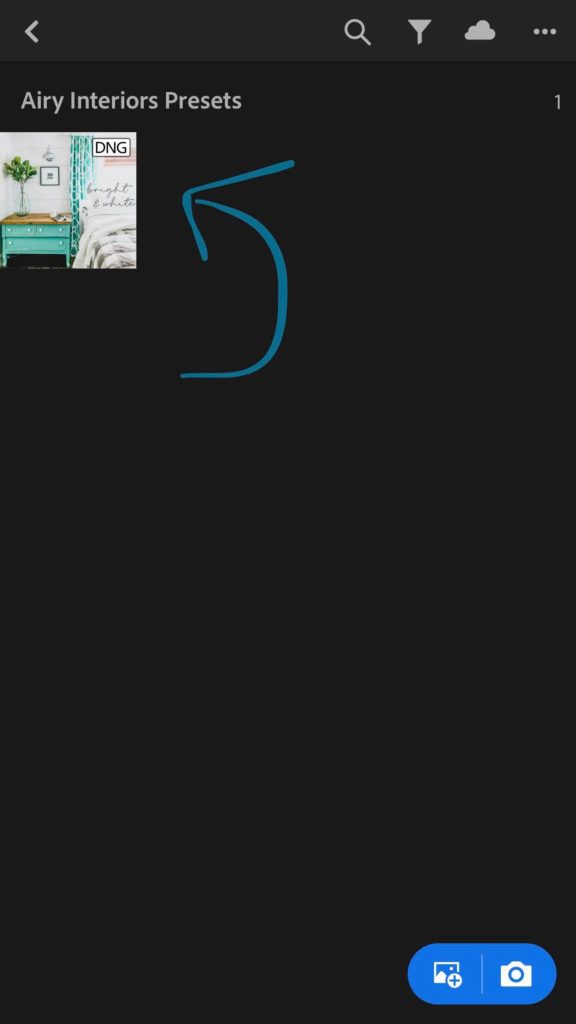
Now your preset is IMPORTED – so let’s actually INSTALL it into your Lightroom Mobile App.

How to Install Lightroom Mobile Presets

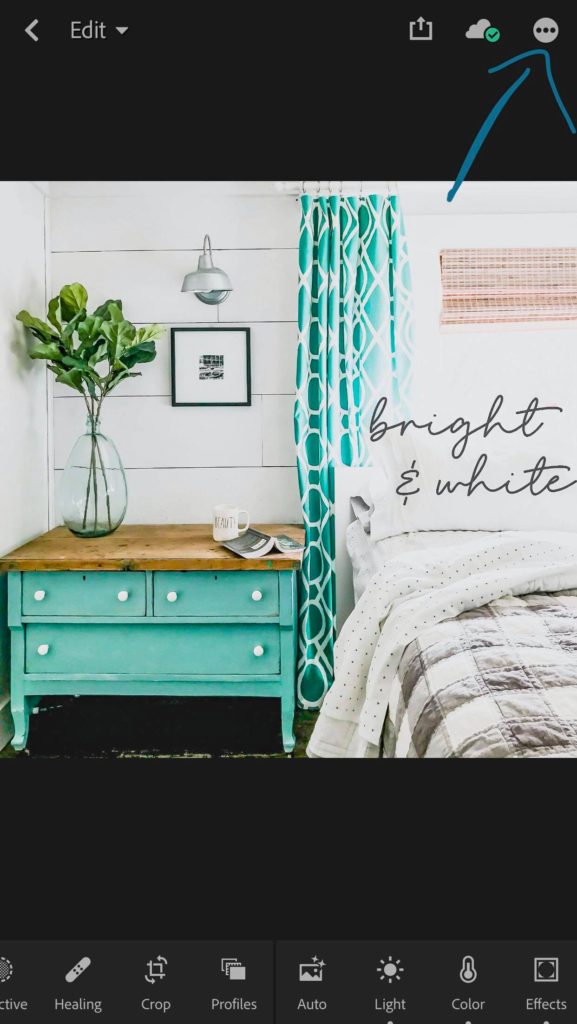
Go into your album where you imported the file and tap on the file. It will open it into the editing area. Now Click on the three dots “…” in the upper right hand corner. 

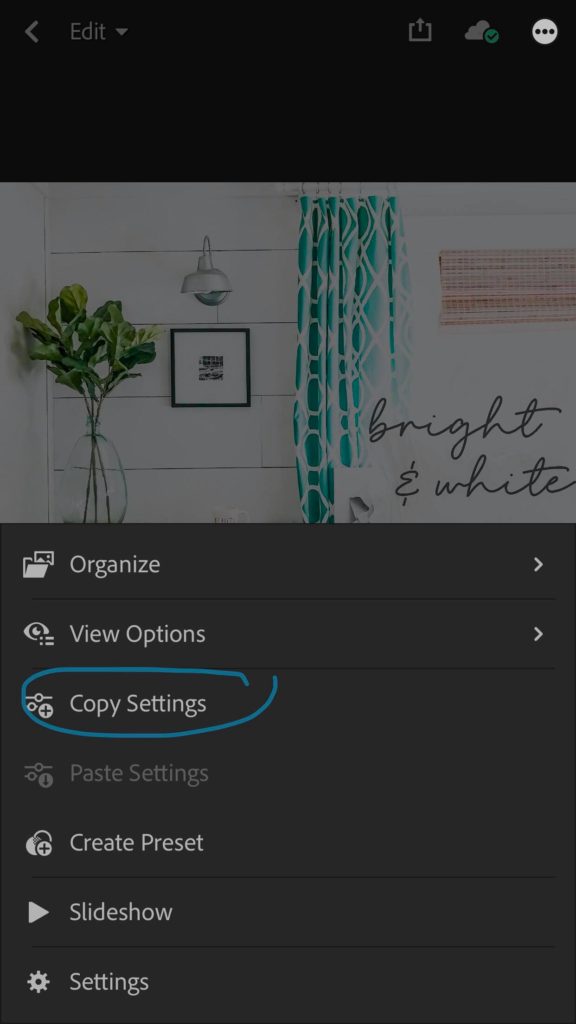
That will open a menu and you need to select “COPY SETTINGS”.

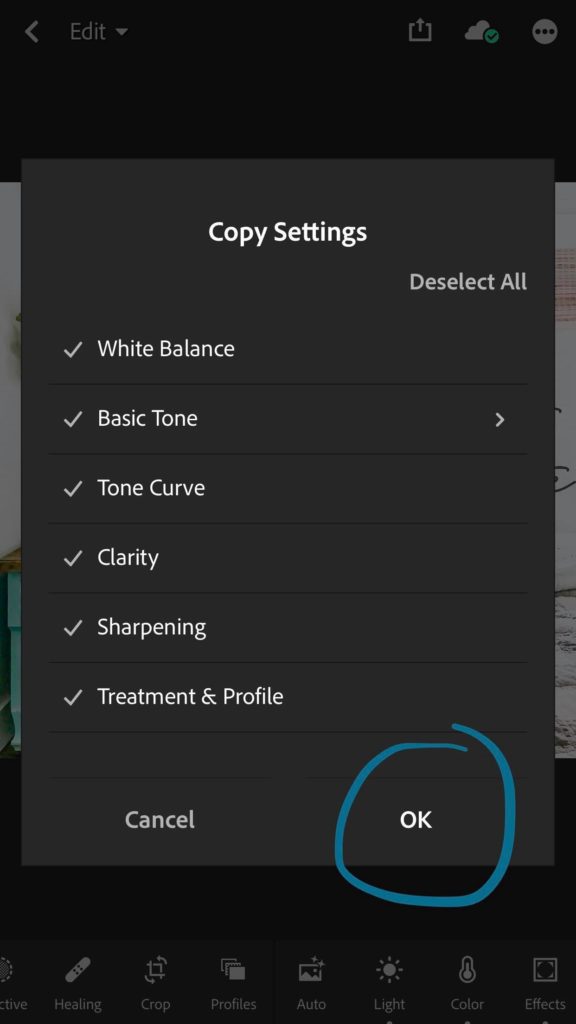
Then click OK so you now have all the settings of that preset on your clipboard.

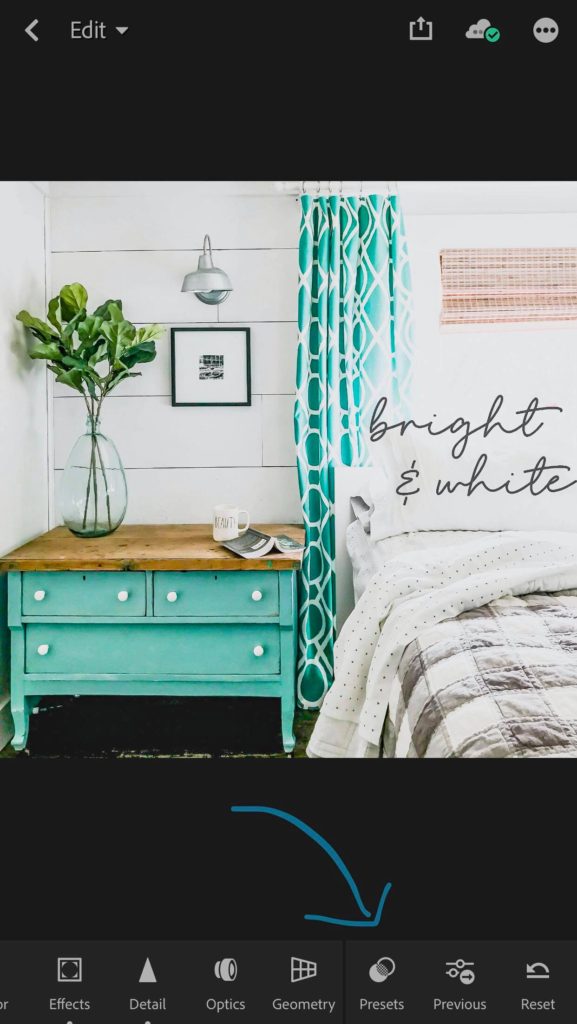
Now scroll over a tiny bit on the bottom slider area and select PRESETS.

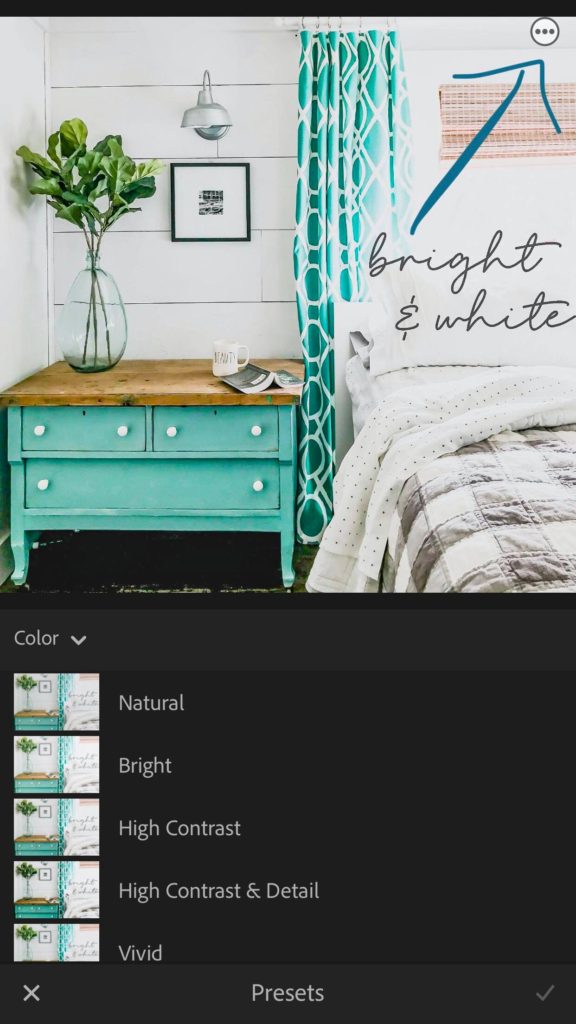
Tap on the three little dots “…” in the upper right hand corner.

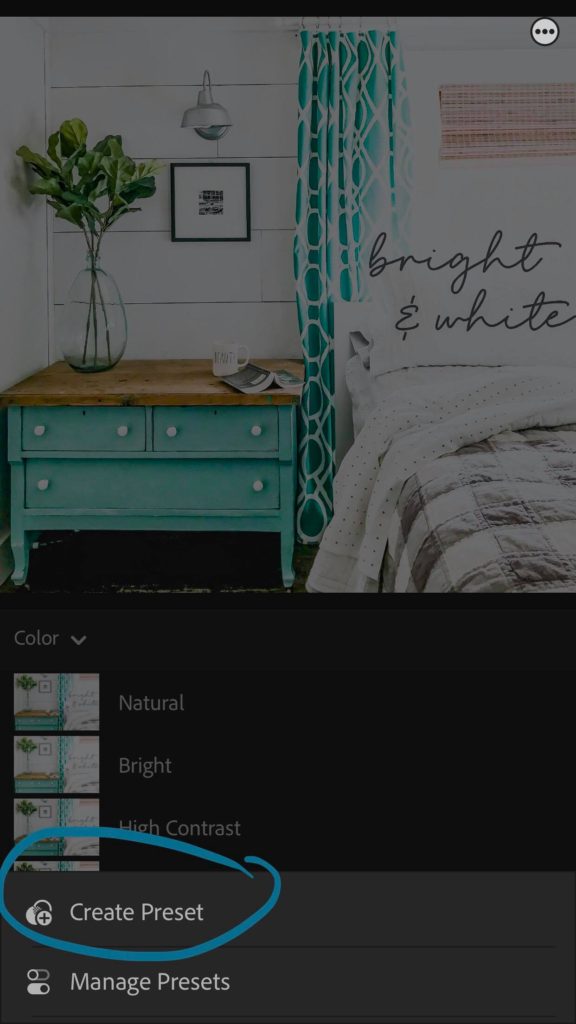
This will open up to let you create a saved preset in your Lightroom Mobile settings. Select CREATE PRESET.

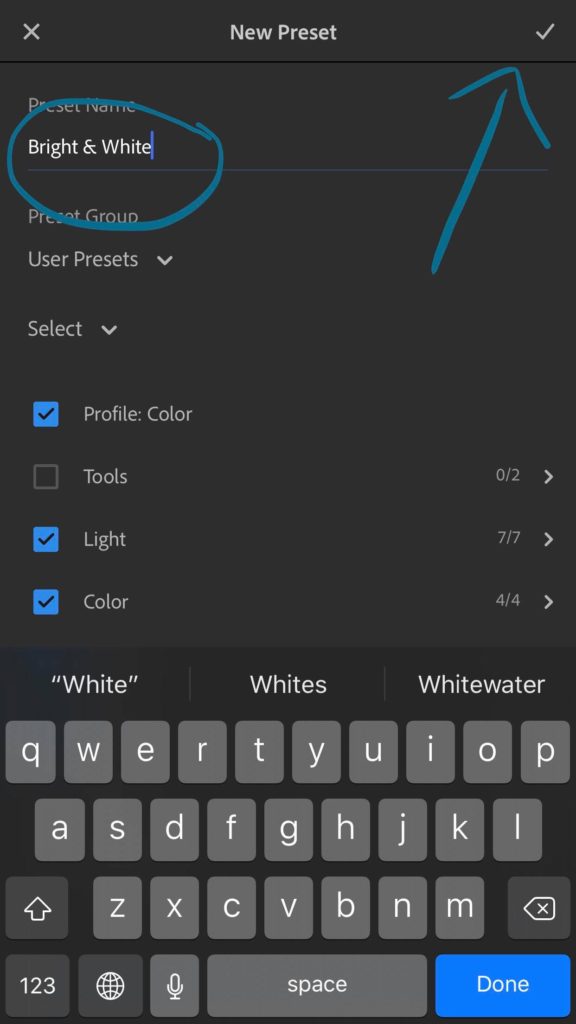
Name your preset (I use the name the creator gave it) and then click the checkmark in the upper right hand corner.

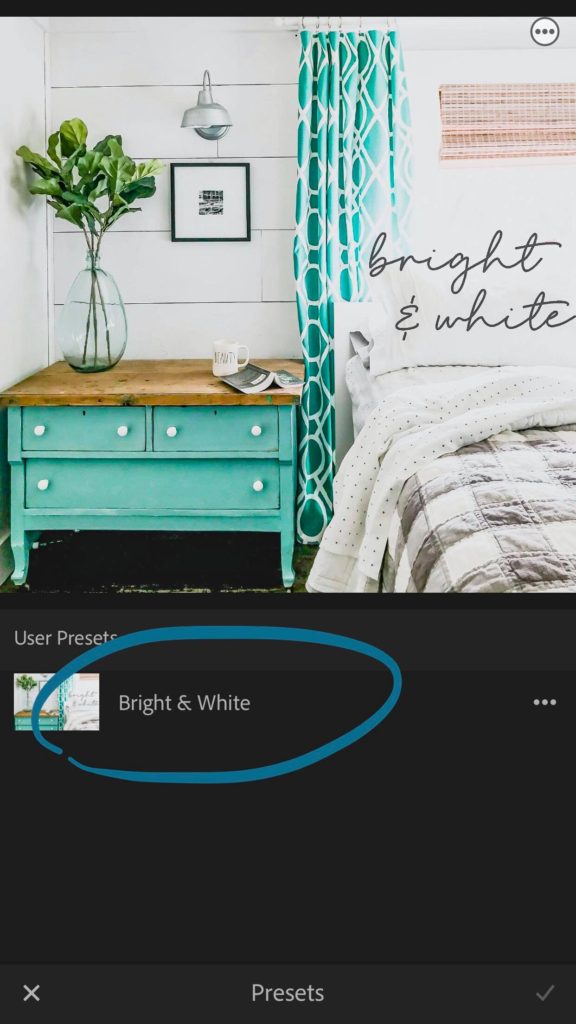
And your preset is now installed! It took you WAY longer to read this post than it will to actually do it yourself. Once you have it, then next time you get ready to edit photos, you just click on “Presets” – choose the one you want and BAM – you’re done!

Here’s a few examples of my Lightroom Mobile Presets:

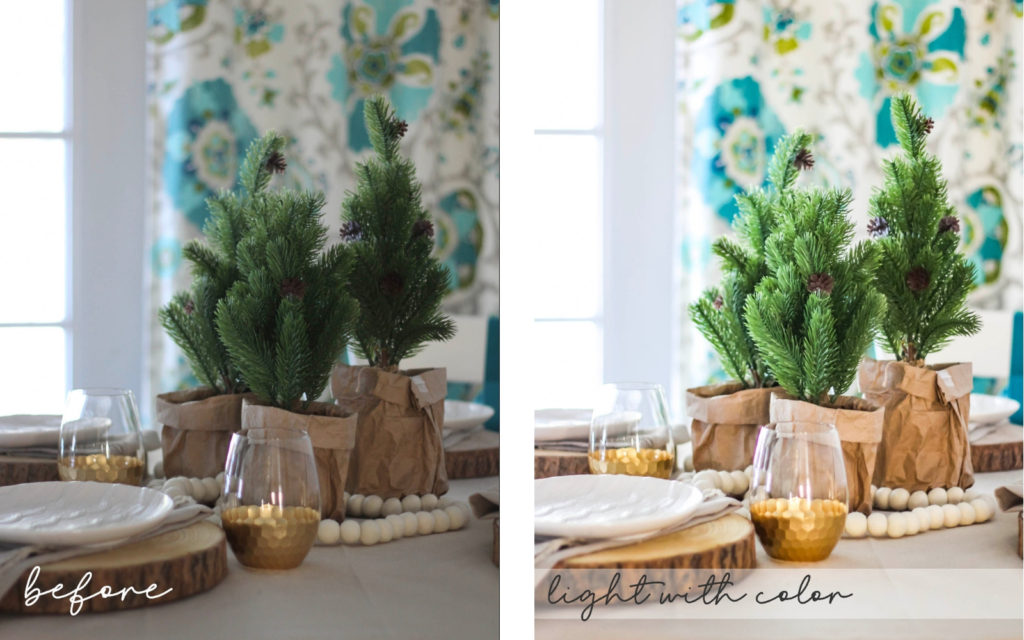
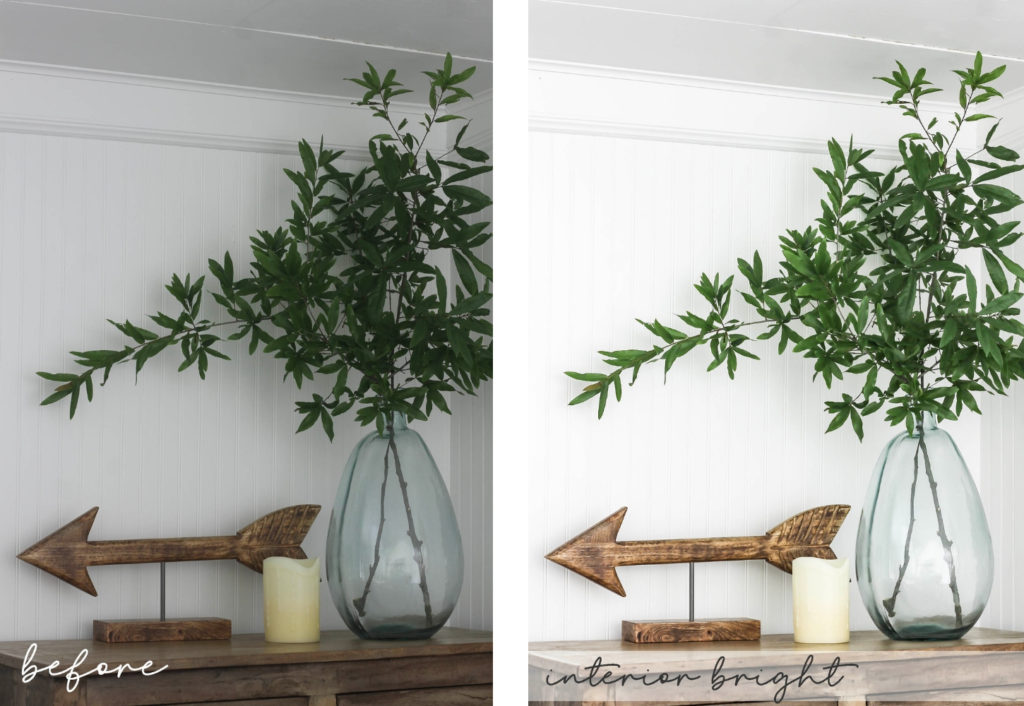
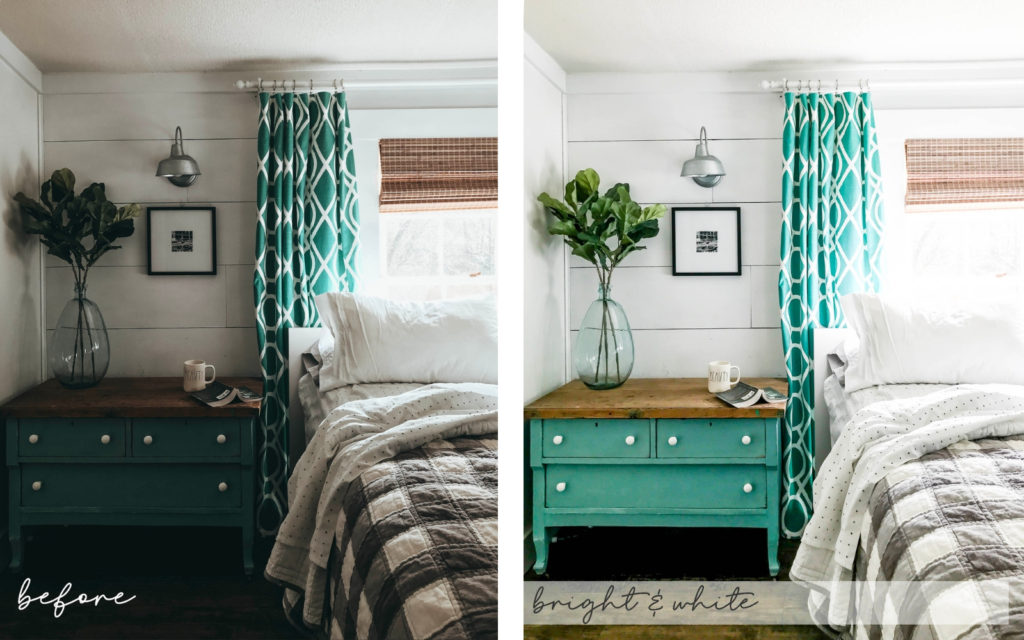
It’s truly astonishing to think that you can get those kind of results in about 2 seconds once you have all of your Lightroom Mobile Presets all installed onto your phone. 

Take your photos from blah to BAM with one tap using Lightroom Mobile Presets. Learn to download and install Lightroom mobile presets - and get this awesome set of 6 presets for FREE! #lightroommobile #phonephotography #photoediting #photography #instagram

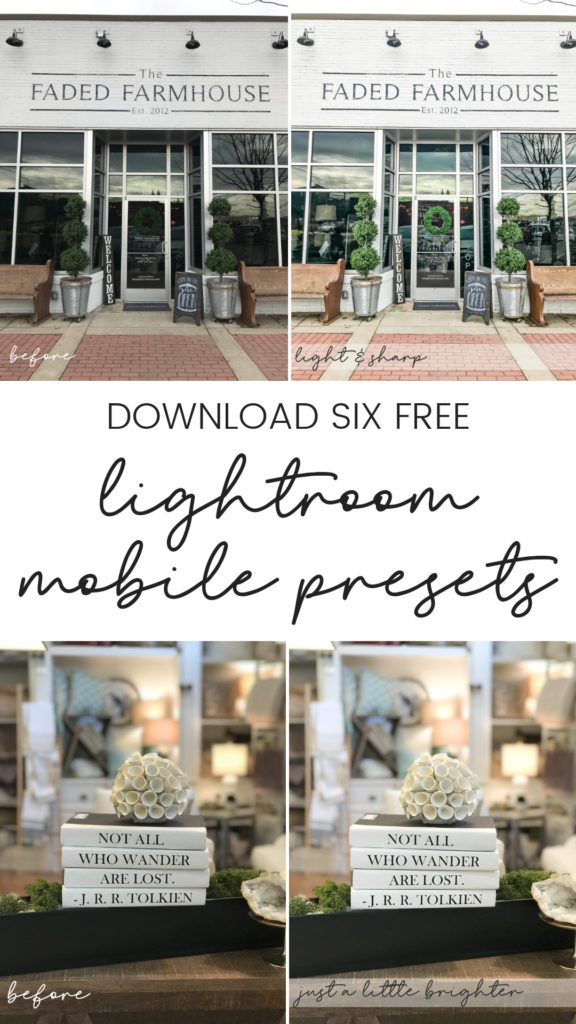
Want my FREE Lightroom Mobile Presets?

These presets are perfect for dark interiors to bring them to life. I use these same presets for many of my Instagram photos and they make editing a snap… or rather – a tap! Just enter your email address below and I’ll send you my set of Airy Interiors Lightroom Mobile Presets for absolutely FREE. It’s a package of six different presets that will help you make an Insta-Star <3 


Filed Under: Instagram

September 28, 2018 by Gina Luker

How to Start a Blog in 15 Minutes

About ten years ago I googled How to Start a Blog and it became the turning point in my life. Sound dramatic? Well the change it made in my life is nothing short of a blessing. Learning to start a blog was just the beginning, but once I learned how to make money blogging, our lives were changed. Our family went from barely being able to make ends meet to being able to support my entire family from blogging. Because we can run the blog from anywhere in the world, we can travel when we want, and have a flexible schedule that allows us to live the life of our dreams.

Why am I telling you this? Because anyone can do it. You can do it. Yes, YOU.

Although it took me over two years to make a good, full time income – today it’s easier than ever. With ad networks, affiliate programs, companies who want to sponsor blog posts…. the potential for earning six figures is completely realistic. Literally the only thing you need is a laptop and a wifi connection. Once your blog is set up, you’re off and running bravely into the direction of your dreams. 

When I started my blog we could barely keep the lights on. We were so far in debt that we couldn’t breathe and were just barely scraping by. Today I’m a full time blogger, my husband no longer goes to a job he hates every day, we travel all over the country as much as we want, whenever we want, and have a life I could never have dreamed of. I’m not telling you this to brag about my “awesome life” – but to tell you that if you’re struggling, then I understand. Because I’ve been there. I’ve sooooo been there. But today our lives (and our children’s lives) have been changed forever because of the power of blogging.

No matter what you’re into – there are millions of others who are looking for the knowledge you have, right now! People who want to learn from someone who’s been through what they have – someone they can relate to – someone that can entertain them – someone they connect with.

And as a blogger…. that’s what you’re doing. You’re not a robot typing lines to just feed knowledge. As a blogger, we want to build communities of people who are passionate about the same things we are. We want to make an impact on someone’s life…. even in the tiniest of ways! 


Before we get into how to start a blog on WordPress, let’s go through a few commonly asked questions first to see if blogging is right for you.

WHO SHOULD START A BLOG

This is a question a lot of people ask themselves. I started my lifestyle blog (The Shabby Creek Cottage) on a whim as a scrapbook of sorts to keep up with the changes of remodeling our childhood home. I had no idea that it would turn into a business – one that would change the course of our lives. 

As humans, we typically have a lot to say about life. And also, you have unique knowledge & experiences & you’ve figured something out, somewhere that will help people on some level. So, in my opinion, anyone that wants to share their gifts with the world should have a blog. Maybe you’re an amazing singer… maybe you can rock a hoola hoop like nobody’s business. No matter what your gift is in life, you should be sharing it with the world. 

Besides just sharing your gifts, you can monetize your blog in a million different ways that will help you to grow your income while growing your influence. Imagine you were doing what you LOVE doing every day anyway, but then getting paid for it?!? Wouldn’t that be a dream? Well that’s exactly how blogging works. 

WHY YOU NEED TO START A BLOG

No matter what social media outlet you look at, you’ll always find people who have massive followings. Facebook, Instagram, Snapchat, Pinterest, YouTube…. the list could go on and on and on. And, unfortunately, many of them just don’t see the value in building their own blog because their audience is right there in front of them. 

But what if that social media goes away? They stand to lose their entire audience in one fail swoop – and if they’ve built that following into a money-making platform, their goes their entire business. Don’t think it can happen? Then think again. It happened to MySpace several years ago, and even just a couple of years ago it happened to the highly-active Vine app. Periscope isn’t even as popular as it once was. While, yes, you do need social media, it shouldn’t be the core of your business. And yes, a blog that makes money IS a business. 

Additionally, if you have any sort of social media following now…. you need somewhere to direct them so you’re not depending on an algorithm that may — or may not — show your posts to your audience. If you’re depending on another site to make you money, you have to realize that those sites are in it for themselves. So they have very little interest in your success. Your job is to position yourself in an area where YOU have all the control. And you can’t do that on any site you don’t own.

TIPS FOR STARTING A BLOG

There’s really only a couple of things you need to really consider: “Who are you trying to help with your blog?” and “How can you bring value to your readers?” While things like your URL are important, first you should deeply consider who you want to help in the world. If you want to help women who want to learn how to dress better and stress less, then you need to come up with 10-15 ideas for blog posts that will help them in their quest to do so.

Once you’ve figured out who you want to help and how, then you can start to build your brand around that information. So if you’re aiming for a 32 year old mom with two kids, think about what colors she’d like and would be drawn to. This will help you figure out things like branding and creating a logo. Also when you choose your URL, make sure you choose one that people will understand what the site is about with a glance. If your blog is called “The Classy Closet” then you know that the blog is about fashion, etc. 

Even before you get started, know that overwhelm is a real struggle with a LOT of bloggers. There’s a million things to learn – and no one knows it all. But you need to figure out chunks at a time, starting where you can have the most control while making the most impact. 

Start by learning to properly write a blog post (I’ve covered that in THIS POST). After you have that figured out, then you need to learn how to start an email list and use it for your blog. It’s the most consistent place to promote yourself, and other than your blog it is the only thing you have 100% control over. 

And third, I highly suggest you learn how to make money blogging. Because blogging can be a reallllly lucrative career – and the faster you learn how to turn it into a business, the better off you’ll be.

*this post contains affiliate links*

NOW THAT YOU’VE DECIDED THAT YOU’RE READY… you have a big choice to make…

So when you start learning how to start a blog, you have to choose one of two paths…..

Blogspot OR WordPress

If you want to learn how to start a blog that will make money, then I always go with WordPress – hands down. Why?

  • There’s a lot more flexibility in WordPress, along with tons of options just not available on Blogspot.
  • Every highly successful blogger I know uses WordPress – and if you start on Blogspot (and want to actually grow your business) you’ll want to move eventually. – PS – even NASA uses a WordPress platform for their site. So if it’s good enough for NASA, it works for me.
  • Most brands who work with bloggers prefer WordPress blogs because they are so much more professional and it means you’re taking blogging seriously. Why not start off on the right path from the beginning?

How much will it cost to start a blog?

The investment is pretty minimal – you can run a blog with BlueHost for about $50 a year, complete with a domain name. So for less that it costs for two people to go out to dinner, you can start your own blogging business in less than 15 minutes. There are things you’ll need to purchase as you grow, but you can totally start they whole shebang for under $50.

Almost any business will cost money to get started – but a blog is one of the cheapest businesses you can start. Once upon a time you needed a fancy camera and all sorts of things to use to create content. These days, however, people have amazing cameras right in their pockets! Even though I have tons of great equipment, I take the vast majority of my photos these days with my iPhone – so there’s really no reason to buy a big, fancy camera until you just can’t work from your phone any more.

On top of that, all you really need is a laptop & wifi. Seriously, that’s it. And you probably already have the phone, laptop and Wifi. So you’re literally only $50 and 15 minutes from starting a business that you can run anywhere in the world and make six figures in less than a year of work if you do the right things to make it happen. 

Ready to learn how to start a blog on WordPress?

Then let’s get started! We’re going to walk through it on BlueHost. 

STEP ONE: Find a host. If you’re just starting out I recommend BlueHost. It’s easy to use and will walk you through the process step by step. And if you make a mistake, it’s ok. They offer 24/7 support that helps you out (I got in a jam myself, so I had to call and found them incredibly helpful!)

How to Start a Blog From Scratch in only 15 Minutes

STEP TWO: Choose a plan. Bluehost starts at $3.95 a month, which is perfect for a beginner. It will set you up on a shared server, you get a free domain name and you get a free domain-served email address. (PS – that alone can be over $300 a year on other services.)

How to Start a Blog From Scratch in only 15 Minutes

STEP THREE: Pick your domain name. You get a free domain name when you sign up with Bluehost, or if you’ve already purchased you can use a domain you already own. TIP – when choosing a name, think things through. If you’re doing a craft blog, try to have craft in the URL – same for recipes, DIY, sewing, etc. Your domain name is pretty important, so think it through. I wanted a landing page for my own name, which is why I went that direction.

How to Start a Blog From Scratch in only 15 Minutes

STEP FOUR: Create an account on Bluehost.  Not only will this create an account so you can purchase, but it will also be your info for your dashboard. Next, follow through with all the payment info (after you’ve read the fine print, of course!)

How to Start a Blog From Scratch in only 15 Minutes

STEP FIVE: Submit your payment information (make sure you read the terms & policies!)

How to Start a Blog From Scratch in only 15 Minutes


How to Start a Blog From Scratch in only 15 Minutes

STEP SIX:  Set up your account password. Be sure to jot it down where you can remember it!

STEP SIX:  Set up your account password. Be sure to jot it down where you can remember it!

STEP SEVEN: Log into your dashboard. After you get into your Bluehost Dashboard, you’ll be able to go in and add in WordPress. Look under the WEBSITE tab and click on INSTALL WORDPRESS.

This lady makes over $250K a year blogging! Step by step process on how to start a blog on WordPress. Even includes installing a free theme. This is the best tutorial I've ever seen on how to start a blog!

STEP EIGHT: Install WordPress. You can let Bluehost do it for you (for a reasonable fee) or you can do it yourself. Let’s go with free.

This lady makes over $250K a year blogging! Step by step process on how to start a blog on WordPress. Even includes installing a free theme. This is the best tutorial I've ever seen on how to start a blog!

STEP NINE: Choose the domain to install it to. Usually it pops up the correct one, but be sure to verify that it’s right. If not, select the correct one in the drop down box. You’ll set up your password, etc. Then check your email to check for details. Click CHECK DOMAIN, then it will give you the option to install. After you click that and it is finished, then you’re going to need to go over to your admin panel of your blog.

Step by step process on how to start a blog on WordPress. Even includes installing a free theme. This is the best tutorial I've ever seen on how to start a blog!

STEP TEN: Log into your WordPress dashboard. You can find it at YOURBLOGURL.com/wp-admin.

How to Start a Blog From Scratch in only 15 Minutes

STEP ELEVEN: Choose your theme. You can choose a paid theme when you’re installing through Bluehost (there’s tons of great options!) or you can use a free theme. You can tweak things as much or as little as you’d like.

How to Start a Blog From Scratch in only 15 Minutes

STEP TWELVE: Start your site! Once you’ve got your theme installed, you’re ready to start putting content onto your site.

How to Start a Blog From Scratch in only 15 Minutes

STEP THIRTEEN: Start to set up your site. You’ll go through a series of questions to help guide you on where to go. 

How to Start a Blog From Scratch in only 15 Minutes

STEP FOURTEEN: Get ready to launch! This is the exciting part… because this is where your blog will  actually become LIVE! So click on “launch”…

How to Start a Blog From Scratch in only 15 Minutes

STEP FIFTEEN: Give your site a title (this blog would be GINA LUKER) and description (mine is “all about the business of blogging.”)

How to Start a Blog From Scratch in only 15 Minutes

Then you’re ready to write! See – it’s really easy when you know how to start a blog. This whole process takes less than 15 minutes from start to finish. If you need more help, you can always log into your account on Bluehost & find helpful links + more.

By the way…. congratulations! You now own a piece of the internet and you’ve taken the biggest step towards creating the blogging biz of your dreams! It can be done – and has been done by hundreds of thousands (if not millions) of bloggers out there who are crushing it every day and making their dreams a reality. 

How to start a blog & make money blogging. This lady makes $250K a year blogging and shows you how to do it step by step.

Now that you know how to start a blog, let me show you how to make money blogging!

If you start a blog I’d love to see it! Just leave a note below in the comments so I can stop and say hello!

Filed Under: start a blog, top feature, Uncategorized

June 20, 2018 by Gina Luker

Are You Overcomplicating Blogging?

When you overcomplicate blogging, you create a level of stress that doesn’t need to exist. Successful blogging does take work, but it shouldn’t leave your head spinning. 

So instead of dreading, whining, and procrastinating about what you should be doing, use simple and effective strategies that will help you to get it all done!

Yes, I know there are a lot of moving parts to a blog. But, overcomplicating blogging isn’t going to do you, or your Google ranking, any favors. 

So, have you been overcomplicating blogging? Tell me how.

https://www.ginaluker.com/wp-content/uploads/2018/06/Gina-Luker-Live-Are-You-Making-Blogging-Too-Complicated-1.mp3

Podcast: Play in new window | Download

Subscribe: Android | Google Podcasts | RSS

Filed Under: Gina Luker Live

June 9, 2018 by Gina Luker

The Ultimate Blueprint for How to Write a Blog Post

Ever wonder how some of the “big bloggers” get all that traffic? At the core of it they know how to write blog posts that are crazy good. The core of a blog is the content – and the better the content the better the blog typically does.

*Before we start – this post contains affiliate links to products I highly recommend for blogging. Many have free versions but if you purchase an upgrade, I will make a tiny portion of the sale price with no additional cost to you*

There are two types of blog posts: Entertaining or Informational

All content either teaches you something or it tells a story to evoke emotion – but if you can do both of these at the same time then you’re really in the zone of how to write a blog post perfectly.

Anyone can write a blog post on how to do basically anything – and if that post teaches you the topic then a reader is in and out in no time. Mission accomplished.

Story telling bloggers have a different agenda – they want you to feel a connection with them. Storytelling is an art – and the main job of any art is to evoke emotion. If the writer brings out an emotion of the reader (whether good or bad) then they have done their job.

But there’s this sweet spot…. one where you can TEACH the reader while you are entertaining them. This is the basis of how I’ve written my blog posts for years and years. I’m not heavy on the emotion, but I do want to at least get a smile out of the reader with a little sassy saying or a quick story that relates to the subject.

Now that you know what kind of content you can write, let’s learn the logistics of how to write a blog post effectively.

First you need an idea. And honestly – the simpler the better. 

Think of it as building a house. While it’s amazing to think about what kind of wallpaper you’d like, you probably would like to get the foundation of the house put in place before trying to hang the wallpaper, right?

So you need content that builds one thing upon another. You need the basic layer before you can go into more advanced content. Even if you know the content has been written a million times before – no one will write it quite like you. 

Back to the idea… Let’s say you want to write a post on how to hang a curtain rod. Before you actually go off to do that project and take all the photos you’ll need, do a bit of research.

How to write a blog post the correct way - use a keyword finder tool before starting

Using a KEYWORD FINDER TOOL, you can see if people actually want to know that information – because this is the most important lesson today:

IF NO ONE WANTS TO READ THE CONTENT YOU ARE PROBABLY WASTING YOUR TIME WRITING IT.

I know… it’s harsh. But the point of creating content is so people who need/want that information can find it. So do your homework before hand to make sure that content is a great match for who you are trying to reach. 

Now that you have an idea and a great keyword – now what?

The real work begins. If it is project based, then you need to do the project. Which means taking photographs, editing said photos and then uploading them. 

If you don’t need any step by step photos, you might consider using stock photos (like I have in this post) so you can still have some visual references to your content. 

The internet is VISUALLY DRIVEN content. Which means consumers (aka readers) want to SEE images, not just read words. 

And also, 3,000 words of prose with no photo breaks can get pretty exhausting. So sprinkle in a few to give the readers eyes time to catch their “breath.” 

Sitting down to actually write.

Once you have the idea, then find the proper keyword (we’ll dive more into that in a future post), and have your photos ready to go, then you need to create structure that will keep the reader…. well, reading.

Let’s look at a list of dos & don’ts. 

DON’T….

  • Write super long paragraphs. Readers will only digest the first 5 or 6 words and the last 3-4 of super long prose. Use short sentences that are easily digestible.
  • Over explain. Just say what you’ve got to say in as few words as possible. 
  • Under explain. But do make sure you have covered the topic enough that someone with no knowledge of the subject can walk away with adequate understanding.
  • Assume anything. There are people who don’t know anything at all so break it down appropriately.
  • Publish without proofreading. Even when I proofread 3 times, I still find mistakes.
  • Don’t beat yourself up about those mistakes. You can always edit. 

DO….

  • Think about your audience first – your blog is all about them, not you. 
  • Use bullet points or numbered lists to help make information more streamlined (like I’m doing right now!)
  • Make use of headings to break up subjects in the same post to show a progression.
  • Take your time to write headlines that get attention while explaining your subject. 
  • Make sure to reference other content within your site so you can help your readers dig deeper into your blog.
  • Let your personality show throughout the post with adding your own voice.
  • Close up the post with a question or thought to provoke comments.

Even if you write entertaining content over informational, most of the same rings true. 

Tips on how to write a great blog post


So let’s recap the basic blueprint of how to write a blog post

  1. Start with an idea.
  2. Check with a keyword tool to ensure the need.
  3. Create the project & visual needs.
  4. Think of what your reader would gain from the subject.
  5. Write a great headline.
  6. Craft a post that explains your subject while keeping your voice true to you.
  7. Break up long posts with appropriate headings.
  8. Use bulleted or numbered lists to keep things neat.
  9. Link to other posts with similar content on your blog.

Filed Under: top feature, Uncategorized

May 16, 2018 by Gina Luker

Should You Start A Podcast?

Podcasting is HOT these days! Everyone is jumping on the bandwagon of not only listening to them – but also starting them. So should YOU start a podcast?

should you start a podcast?

Personally, I think that every single business has the potential to start a podcast. I mean, come on, if you start a business that you’re crazy passionate about, I’m sure you have a lot to say on the subject, right?

Not only that, there’s something about listening to words versus reading them. You can hear the tone, the excitement, the frustration, every little nuance that just can’t come across in the written word nearly as effectively.

So if you’re trying to decide if you should start a podcast, here’s a recent Facebook Live (turned podcast) that I did to help you think it through and decided if it’s right for you:


HIT PLAY TO LISTEN TO “HOW TO START A PODCAST”


https://www.ginaluker.com/wp-content/uploads/2018/03/Gina-Luker-Live-Should-You-Start-A-Podcast.mp3

Podcast: Play in new window | Download

Subscribe: Android | Google Podcasts | RSS

Filed Under: Gina Luker Live

Next Page »

Primary Sidebar

Hey there, I’m Gina!

I’m a slayer of blogging myths and mysteries by not only teaching you what you should be doing to grow a successful blog, but also how to do it, step by step.

Join me!

Subscribe to the Podcast

on Androidon Google Podcastsvia RSS

RECOMMENDED RESOURCES

Tailwind Visual Marketing Suite
  • About
  • Home
  • Blog
  • Courses
  • Resources
  • Privacy Policy

Copyright © 2025 · Hello Pro on Genesis Framework · WordPress · Log in